Trace-rs: A Simple Path Tracer in Rust
Table of Contents
Recently I’ve committed myself to using Rust for all of my personal projects, and typically when I learn a new language I try to do so by implementing a well-defined project that’s not super complicated, but offers enough complexity to allow me to dive into the core concepts of the language. Since Rust is built for speed and safety, I figured that building a basic path tracer (or ray tracer) would be a great introduction. There’s a great set of books on the subject of path tracers that are available online for free which will take the reader from knowing practically nothing about graphics to implementing a basic path tracer - the only catch is all of the code is written in C++. In this post, I’ll be following along the first book, “Ray Tracing In One Weekend,” providing code samples of my implementation in Rust, and links to my implementation of each chapter on my GitHub page. The first chapter is just some introductory information about graphics and ray tracing, the previous iterations of the book, and some acknowledgements, so I’ll be starting on chapter 2 (though I recommend reading chapter 1).
Setup⌗
Rust has a pretty nice ecosystem for managing toolchains and creating project scaffolding. For this project, I’m going to be working with the latest stable version of Rust, but I’m pretty sure nightly would work as well. I’ll create a lib project in my dev directory with cargo:
~/dev
➜ cargo new --lib trace-rs
     Created library `trace-rs` package
Which will initialize a project skeleton.
Chapter 2⌗
The meat of the book starts with the “Hello, world!” of graphics - just a basic color gradient. Straight away, I’m going to deviate from the book’s implementation just a little bit and instead of using the text-based PPM image format, I’m going to use PNG. To create a PNG encoder, we’ll need to use the png crate:
# cargo.toml
...

[dependencies]
png = "0.16.7"
// src/bin/main.rs
use std::fs::File;
use std::io::BufWriter;
use std::path::Path;

use png;

fn main() {
    let width = 600;
    let height = 400;

    let mut data = Vec::new();
    for j in (0..height).rev() {
        for i in 0..width {
            let r = i as f64 / width as f64;
            let g = j as f64 / height as f64;
            let b = 0.25;
            let ir = (255.99 * r as f64) as u8;
            let ig = (255.99 * g as f64) as u8;
            let ib = (255.99 * b as f64) as u8;
            data.extend_from_slice(&[ir, ig, ib, 255]);
        }
    }

    let path = Path::new(r"./images/chapter-2.png");
    let file = File::create(path).unwrap();
    let w = BufWriter::new(file);

    let mut encoder = png::Encoder::new(w, width, height);
    encoder.set_color(png::ColorType::RGBA);
    encoder.set_depth(png::BitDepth::Eight);
    let mut writer = encoder.write_header().unwrap();
    writer.write_image_data(data.as_slice()).unwrap();
}
When we execute this, we get:
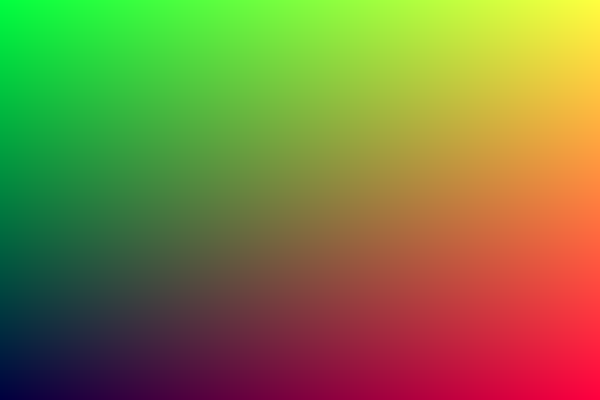
Neat! Here, we create a mutable variable data of type Vec<???>. That ??? is intentional; when we instantiate data we don’t actually know the type of the elements. Instead, the compiler will infer the type later when we start adding elements to it. Explicitly defining the type works too, e.g. let mut data: Vec<u8> = Vec::new(). We then loop through each pixel in our image and compute three RGB values between 0 and 256, and then we add them to data. Once we’ve looped through all of the pixels, we write out the PNG file.
The book improves on this slightly by adding a visual progress indicator. We can do this in rust by using the indicatif crate:
// src/bin/main.rs
...
use indicatif::ProgressBar;

fn main() {
    ...
    let bar = ProgressBar::new((width * height) as u64);

    ...

    for j in (0..height).rev() {
        for i in 0..width {
            ...
            bar.inc(1);
        }
    }
    bar.finish();

    ...
}
Running this again, we should get the same image, but in the terminal there should be a progress bar indicating how far along the process is.
And that’s it for chapter 2!
Chapter 3⌗
The first major step towards creating a ray tracer is creating a class to store 3D points. Chapter 3 introduces the vec3 class, which is essentially just a wrapper around three floating point numbers. In addition, a few instance methods are defined, and some operators are implemented for vec3/vec3 and vec3/f64 operations. In rust, this is done by implementing the operation’s respective trait from the std::ops crate. We’ll also create a couple of type aliases for Point3 and Colors while we’re at it.
use std::ops;

#[derive(Clone, Copy, Debug, PartialEq)]
pub struct Vec3(pub f64, pub f64, pub f64);

pub type Point3 = Vec3;
pub type Color = Vec3;

impl Vec3 {
    pub fn new(x: f64, y: f64, z: f64) -> Self {
        Vec3(x, y, z)
    }

    pub fn x(&self) -> f64 {
        self.0
    }

    pub fn y(&self) -> f64 {
        self.1
    }

    pub fn z(&self) -> f64 {
        self.2
    }

    pub fn length_squared(&self) -> f64 {
        self.0 * self.0 + self.1 * self.1 + self.2 * self.2
    }

    pub fn length(&self) -> f64 {
        self.length_squared().sqrt()
    }
}

impl ops::Neg for Vec3 {
    type Output = Vec3;

    fn neg(self) -> Self::Output {
        Vec3::new(-self.0, -self.1, -self.2)
    }
}

impl ops::Add for Vec3 {
    type Output = Vec3;

    fn add(self, rhs: Vec3) -> Self::Output {
        Vec3::new(self.0 + rhs.0, self.1 + rhs.1, self.2 + rhs.2)
    }
}

impl ops::AddAssign for Vec3 {
    fn add_assign(&mut self, rhs: Vec3) {
        self.0 += rhs.0;
        self.1 += rhs.1;
        self.2 += rhs.2;
    }
}

impl ops::Sub for Vec3 {
    type Output = Vec3;

    fn sub(self, rhs: Vec3) -> Self::Output {
        Vec3::new(self.0 - rhs.0, self.1 - rhs.1, self.2 - rhs.2)
    }
}

impl ops::Mul for Vec3 {
    type Output = Vec3;

    fn mul(self, rhs: Vec3) -> Self::Output {
        Vec3::new(self.0 * rhs.0, self.1 * rhs.1, self.2 * rhs.2)
    }
}

impl ops::Mul<f64> for Vec3 {
    type Output = Vec3;

    fn mul(self, rhs: f64) -> Self::Output {
        Vec3::new(self.0 * rhs, self.1 * rhs, self.2 * rhs)
    }
}

impl ops::Mul<Vec3> for f64 {
    type Output = Vec3;

    fn mul(self, rhs: Vec3) -> Self::Output {
        Vec3::new(self * rhs.0, self * rhs.1, self * rhs.2)
    }
}

impl ops::MulAssign for Vec3 {
    fn mul_assign(&mut self, rhs: Vec3) {
        self.0 *= rhs.0;
        self.1 *= rhs.1;
        self.2 *= rhs.2;
    }
}

impl ops::Div<f64> for Vec3 {
    type Output = Vec3;

    fn div(self, rhs: f64) -> Self::Output {
        Vec3::new(self.0 / rhs, self.1 / rhs, self.2 / rhs)
    }
}

impl ops::DivAssign for Vec3 {
    fn div_assign(&mut self, rhs: Vec3) {
        self.0 /= rhs.0;
        self.1 /= rhs.1;
        self.2 /= rhs.2;
    }
}

pub fn dot(u: &Vec3, v: &Vec3) -> f64 {
    u.0 * v.0 + u.1 * v.1 + u.2 * v.2
}

pub fn cross(u: &Vec3, v: &Vec3) -> Vec3 {
    Vec3::new(
        u.1 * v.2 - u.2 * v.1,
        u.2 * v.0 - u.0 * v.2,
        u.0 * v.1 - u.1 * v.0,
    )
}

pub fn unit_vector(v: Vec3) -> Vec3 {
    v / v.length()
}
In addition, we’ll create a helper function in a new file called color.rs to write the current pixel color to the data buffer:
use crate::vec3::Color;

pub fn write_color(data: &mut Vec<u8>, pixel_color: Color) {
    data.extend_from_slice(&[
        (255.99 * pixel_color.x()) as u8,
        (255.99 * pixel_color.y()) as u8,
        (255.99 * pixel_color.z()) as u8,
        255,
    ]);
}
And finally, we’ll update main to use this new functionality:
// ...

use trace::color::write_color;
use trace::vec3::Color;

fn main() {
    // ...
    for j in (0..height).rev() {
        for i in 0..width {
            let pixel_color = Color::new(
                i as f64 / (width - 1) as f64,
                j as f64 / (height - 1) as f64,
                0.25,
            );
            write_color(&mut data, pixel_color);
            bar.inc(1);
        }
    }
    // ...
}
When we run the code, we end up with this:
I know you’re probably thinking “wait… it’s the same as before.” Well, you’re not wrong, but that’s sort of the point.
That’s about it for chapter 3 - not a whole lot of excitement but it lays the foundation for all of the subsequent chapters.
Chapter 4⌗
Chapter 4 builds on the foundational concepts of the previous chapter and establishes the concept of a Ray. A Ray contains two Vec3s (or rather a Point3 and a Vec3, but they’re one in the same), and has one method at(t: f64):
use crate::vec3::{Point3, Vec3};

pub struct Ray {
    pub origin: Point3,
    pub direction: Vec3,
}

impl Ray {
    pub fn new(origin: Point3, direction: Vec3) -> Self {
        Ray { origin, direction }
    }

    pub fn at(&self, t: f64) -> Point3 {
        self.origin + t * self.direction
    }
}
This is also where an initial camera and viewport implementation is introduced, and this is really where we start to see some of the core concepts of a path tracer start to emerge. A path tracer essentially fires rays from a source (in this case, the “camera”) at pixels within the scene, those rays can bounce onto other objects or be absorbed, and the resulting color is calculated. To achieve this, we create a convenience function to compute the color of a ray, and alter the main function slightly:
// src/bin/main.rs

// ...
fn ray_color(r: Ray) -> Color {
    let unit_direction = unit_vector(r.direction);
    let t = 0.5 * (unit_direction.y() + 1.0);
    (1.0 - t) * Color::new(1.0, 1.0, 1.0) + t * Color::new(0.5, 0.7, 1.0)
}

fn main() {
    // ...
    let aspect_ratio = 16.0 / 9.0;
    let width = 600;
    let height = (width as f64 / aspect_ratio) as u32;

    // camera
    let viewport_height = 2.0;
    let viewport_width = aspect_ratio * viewport_height;
    let focal_length = 1.0;

    let origin = Point3::new(0.0, 0.0, 0.0);
    let horizontal = Vec3::new(viewport_width, 0.0, 0.0);
    let vertical = Vec3::new(0.0, viewport_height, 0.0);
    let lower_left_corner =
        origin - (horizontal / 2.0) - (vertical / 2.0) - Vec3::new(0.0, 0.0, focal_length);

    // ...
    let mut data = Vec::new();
    for j in (0..height).rev() {
        for i in 0..width {
            let u = i as f64 / (width - 1) as f64;
            let v = j as f64 / (height - 1) as f64;
            let r = Ray::new(
                origin,
                lower_left_corner + u * horizontal + v * vertical - origin,
            );
            let pixel_color = ray_color(r);
            // ...
        }
    }

    // ...
}
When we run this, we end up with a nice looking gradient from blue to white:

Chapter 5⌗
This is a pretty short chapter (code-wise, there’s a bunch of vector math) but this is where we get to our first objects in the scene: a simple sphere. I would recommend reading and trying to understand some of the math in this chapter prior to looking at the code since it isn’t super clear how the code will result in the generated image. Here’s the added code (I promise we will get to some more rust-specific features soon):
// src/bin/main.rs

// ...

fn hit_sphere(center: Point3, radius: f64, ray: &Ray) -> bool {
    let oc = ray.origin - center;
    let a = dot(&ray.direction, &ray.direction);
    let b = 2.0 * dot(&oc, &ray.direction);
    let c = dot(&oc, &oc) - radius * radius;
    let discriminant = b * b - 4.0 * a * c;
    discriminant > 0.0
}

fn ray_color(r: Ray) -> Color {
    if hit_sphere(Point3::new(0.0, 0.0, -1.0), 0.5, &r) {
        return Color::new(1.0, 0.0, 0.0);
    }
    // ...
}

// ...
What we end up with is the following image of a red “sphere”:
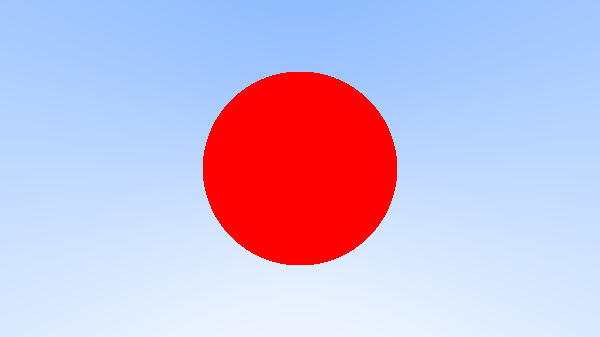
Neat! It’s lacking a ton of things so far, but it’s a start!
Chapter 6⌗
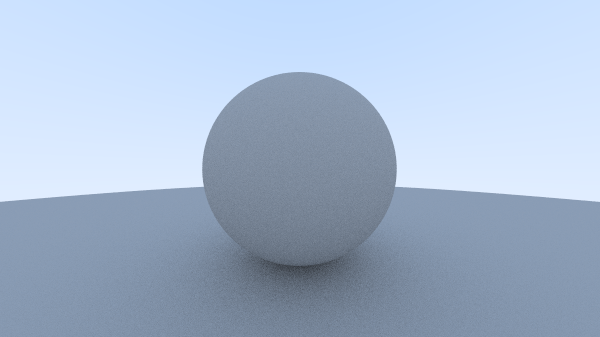
At this point it’s time to start adding some shading to the sphere. For the moment, this is done by mapping surface normals to the RGB spectrum. We modify the hit_sphere and ray_color functions to accomplish this:
// src/bin/main.rs

// ...

fn hit_sphere(center: Point3, radius: f64, ray: &Ray) -> f64 {
    // ...
    if discriminant < 0.0 {
        return -1.0;
    }
    (-b - discriminant.sqrt()) / (2.0 * a)
}

fn ray_color(r: Ray) -> Color {
    let t = hit_sphere(Point3::new(0.0, 0.0, -1.0), 0.5, &r);
    if t > 0.0 {
        let n = unit_vector(r.at(t) - Vec3::new(0.0, 0.0, -1.0));
        return 0.5 * Color::new(n.x() + 1.0, n.y() + 1.0, n.z() + 1.0);
    }
    let unit_direction = unit_vector(r.direction);
    let t = 0.5 * (unit_direction.y() + 1.0);
    (1.0 - t) * Color::new(1.0, 1.0, 1.0) + t * Color::new(0.5, 0.7, 1.0)
}
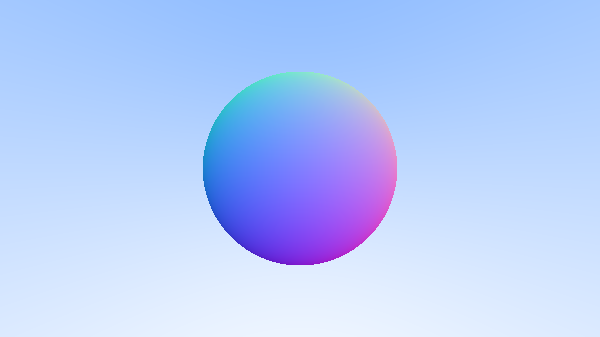
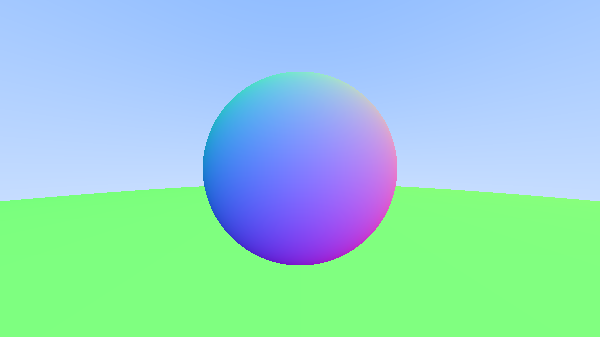
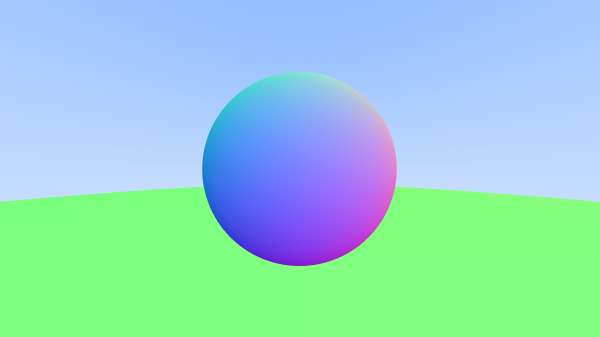
Which results in this image:
The Hit Trait⌗
This solution so far works well for a single sphere in the scene, but if we want to place multiple spheres in the scene, then we are going to want to introduce some abstraction. In the original book, this is done by declaring an abstract class Hittable with a single method hit. In Rust, we can do something similar using traits. I’m going to deviate a little bit from the name of this abstract class in the book and call this trait Hit. The idea to provide an interface which can be implemented on any type to describe the behavior of that object being hit by a ray.
// src/hit.rs
use crate::{
    ray::Ray,
    vec3::{Point3, Vec3},
};

pub struct HitRecord {
    pub p: Point3,
    pub normal: Vec3,
    pub t: f64,
}

pub trait Hit {
    fn hit(&self, r: &Ray, t_min: f64, t_max: f64, rec: &HitRecord) -> bool;
}
The Sphere Struct⌗
A sphere can be boiled down to a center point and a radius. Since we have created a trait to capture the behavior of a hittable object, we can implement the Hit trait on the Sphere type to provide a description for what happens when a sphere is hit. We’ve actually already implemented the logic for this, so we’re pretty much just copying and pasting the code.
// src/sphere.rs
use crate::{
    hit::{Hit, HitRecord},
    ray::Ray,
    vec3::{dot, Point3},
};

pub struct Sphere {
    pub center: Point3,
    pub radius: f64,
}

impl Hit for Sphere {
    fn hit(&self, r: &Ray, t_min: f64, t_max: f64) -> Option<HitRecord> {
        let oc = r.origin - self.center;
        let a = r.direction.length_squared();
        let half_b = dot(&oc, &r.direction);
        let c = oc.length_squared() - self.radius * self.radius;

        let discriminant = half_b * half_b - a * c;
        if discriminant < 0.0 {
            return None;
        }

        let sqrtd = discriminant.sqrt();

        let mut root = (-half_b - sqrtd) / a;
        if (root < t_min) || (t_max < root) {
            root = (-half_b + sqrtd) / a;
            if (root < t_min) || (t_max < root) {
                return None;
            }
        }

        let t = root;
        let p = r.at(t);
        let normal = (p - self.center) / self.radius;
        return Some(HitRecord { t, p, normal });
    }
}
The book also makes some design decisions around the direction of normals. I’m just going to follow the book’s suggestion:
// src/hit.rs
pub struct HitRecord {
    // ...
    pub front_face: bool,
}

impl HitRecord {
    pub fn set_face_normal(&mut self, r: &Ray, outward_normal: Vec3) {
        self.front_face = dot(&r.direction, &outward_normal) < 0.0;
        self.normal = if self.front_face {
            outward_normal
        } else {
            -outward_normal
        };
    }
}

// ...
The Hittable List⌗
To complete the scene of multiple objects, the book creates a special type called HitableList - a wrapper around an array of some objects of any type which implement the Hittable interface. We can do something similar in rust, using Vec<Box<dyn Hit>> - a vector of trait objects. Trait objects can hold the value of any type which implements the trait where the specific type is only known at runtime. Traits themselves don’t really have a size, and the size of any object that implements the trait is not known at compile time, so to get around this we create a list of pointers (Boxes) to the trait which are sized.
In rust, we don’t actually have to create a new type called HitableList that wraps around a Vec<Box<dyn Hit>> - we can just implement the trait on Vec<Box<dyn Hit>> directly.
// src/hit.rs

// ...

impl Hit for Vec<Box<dyn Hit>> {
    fn hit(&self, r: &Ray, t_min: f64, t_max: f64) -> Option<HitRecord> {
        let mut h: Option<HitRecord> = None;
        for hittable in self.iter() {
            if let Some(candidate) = hittable.hit(r, t_min, t_max) {
                match h {
                    None => h = Some(candidate),
                    Some(prev) => {
                        if candidate.t < prev.t {
                            h = Some(candidate);
                        }
                    }
                }
            }
        }
        h
    }
}
All this does is loop through the list of hitable objects, run their respective hit function, and then return an optional HitRecord depending on whether or not the ray hit anything.
We’ll create a utils file:
use std::f64::consts::PI;

pub fn degrees_to_radians(degrees: f64) -> f64 {
    degrees * PI / 180.0
}
And update main.rs with all of the new updates:
// src/bin/main.rs

// ...

fn ray_color(r: &Ray, world: &dyn Hit) -> Color {
    if let Some(hit) = world.hit(r, 0.001, f64::INFINITY) {
        return 0.5 * (hit.normal + Color::new(1.0, 1.0, 1.0));
    }

    let unit_direction = unit_vector(r.direction);
    let t = 0.5 * (unit_direction.y() + 1.0);
    (1.0 - t) * Color::new(1.0, 1.0, 1.0) + t * Color::new(0.5, 0.7, 1.0)
}

fn main() {
    // ...

    // world
    let world: Vec<Box<dyn Hit>> = vec![
        Box::new(Sphere::new(Point3::new(0.0, 0.0, -1.0), 0.5)),
        Box::new(Sphere::new(Point3::new(0.0, -100.5, -1.0), 100.0)),
    ];

    // ...

    for j in (0..height).rev() {
        for i in 0..width {
            // ...

            let pixel_color = ray_color(&r, &world);

            // ...
        }
    }

    // ...
}
What we end up with is the following image:
Neat!
Chapter 7⌗
The edges of the spheres are pretty rough and jagged, so to fix this we introduce some anti-aliasing. This is done by adding a random weight to each ray, and sampling each pixel multiple times. We start by creating a camera type:
// src/camera.rs

use crate::{
    ray::Ray,
    vec3::{Point3, Vec3},
};

pub struct Camera {
    pub origin: Point3,
    pub lower_left_corner: Point3,
    pub horizontal: Vec3,
    pub vertical: Vec3,
}

impl Camera {
    pub fn new() -> Self {
        let aspect_ratio = 16.0 / 9.0;
        let viewport_height = 2.0;
        let viewport_width = aspect_ratio * viewport_height;
        let focal_length = 1.0;
        let origin = Point3::new(0.0, 0.0, 0.0);
        let horizontal = Vec3::new(viewport_width, 0.0, 0.0);
        let vertical = Vec3::new(0.0, viewport_height, 0.0);
        let lower_left_corner =
            origin - horizontal / 2.0 - vertical / 2.0 - Vec3::new(0.0, 0.0, focal_length);
        Camera {
            origin,
            horizontal,
            vertical,
            lower_left_corner,
        }
    }

    pub fn get_ray(&self, u: f64, v: f64) -> Ray {
        Ray::new(
            self.origin,
            self.lower_left_corner + u * self.horizontal + v * self.vertical - self.origin,
        )
    }
}
And create another simple utility function to clamp values between a minimum and maximum value:
// src/util.rs

// ...

pub fn clamp(x: f64, min: f64, max: f64) -> f64 {
    if x < min {
        return min;
    }
    if x > max {
        return max;
    }
    x
}
We then alter the write_color function to scale the color value by the number of samples:
pub fn write_color(data: &mut Vec<u8>, pixel_color: Color, samples_per_pixel: u32) {
    let scale = 1.0 / samples_per_pixel as f64;
    let r = pixel_color.x() * scale;
    let g = pixel_color.y() * scale;
    let b = pixel_color.z() * scale;

    data.extend_from_slice(&[
        (255.99 * clamp(r, 0.0, 0.999)) as u8,
        (255.99 * clamp(g, 0.0, 0.999)) as u8,
        (255.99 * clamp(b, 0.0, 0.999)) as u8,
        255,
    ]);
}
And finally we add the rand dependency to cargo.toml, and update main:
// src/bin/main.rs

// ...

use rand::prelude::*;

// ...

fn main() {
    let mut rng = thread_rng();

    // ...

    // camera
    let cam = Camera::new();

    // ...

    let mut data = Vec::new();
    for j in (0..height).rev() {
        for i in 0..width {
            let mut pixel_color = Color::new(0.0, 0.0, 0.0);
            for s in 0..samples_per_pixel {
                let u = (i as f64 + rng.gen::<f64>()) / (width - 1) as f64;
                let v = (j as f64 + rng.gen::<f64>()) / (height - 1) as f64;
                let r = cam.get_ray(u, v);
                pixel_color += ray_color(&r, &world);
            }
            write_color(&mut data, pixel_color, samples_per_pixel);
            bar.inc(1);
        }
    }

    // ...
}
What we end up with is the same image, but with slightly smoother edges:
Chapter 8⌗
Now we finally start adding some materials, and we’ll start to see some of the effects we can get. This chapter introduces diffuse materials, which is a surface where light either scatters in a random direction off of the surface, or is absorbed. We first add a couple of methods to construct random vectors:
// src/vec3.rs

// ...

impl Vec3 {
    // ...

    pub fn random() -> Self {
        let mut rng = thread_rng();

        Vec3(rng.gen::<f64>(), rng.gen::<f64>(), rng.gen::<f64>())
    }

    pub fn random_range(min: f64, max: f64) -> Self {
        let mut rng = thread_rng();

        Vec3(
            rng.gen_range(min..max),
            rng.gen_range(min..max),
            rng.gen_range(min..max),
        )
    }

    // ...
And another method which will repeatedly create random spheres until one lands within a unit sphere:
// vec3.rs

// ...

pub fn random_in_unit_sphere() -> Vec3 {
    loop {
        let p = Vec3::random_range(-1.0, 1.0);
        if p.length_squared() < 1.0 {
            return p;
        }
    }
}

// ...
Change the ray_color function in main.rs to call itself recursively if it has hit anything:
// src/bin/main.rs

// ...

fn ray_color(r: &Ray, world: &dyn Hit, depth: u32) -> Color {
    if depth <= 0 {
        return Color::new(0.0, 0.0, 0.0);
    }

    if let Some(hit) = world.hit(r, 0.001, f64::INFINITY) {
        let target = hit.p + hit.normal + random_in_unit_sphere();
        return 0.5 * ray_color(&Ray::new(hit.p, target - hit.p), world, depth - 1);
    }

    // ...
}

// ...
And what we end up with is:
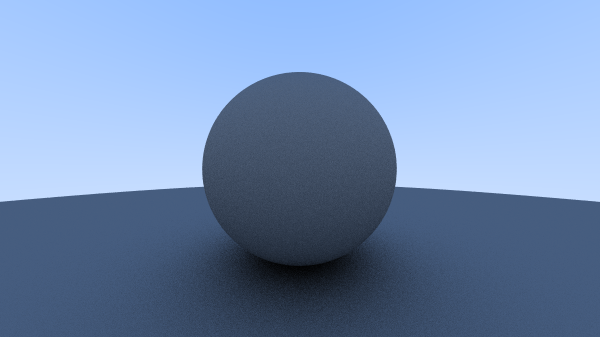
Look at that! Without having to give it any specific instructions, we’ve generated a shadow underneath the sphere. Cool! The image is a bit dark, so we use some simple gamma correction to brighten it up a bit:
// src/color.rs

// ...

pub fn write_color(data: &mut Vec<u8>, pixel_color: Color, samples_per_pixel: u32) {
    // ...

    data.extend_from_slice(&[
        (255.99 * clamp(r.sqrt(), 0.0, 0.999)) as u8,
        (255.99 * clamp(g.sqrt(), 0.0, 0.999)) as u8,
        (255.99 * clamp(b.sqrt(), 0.0, 0.999)) as u8,
        255,
    ]);
}
And we wind up with this:
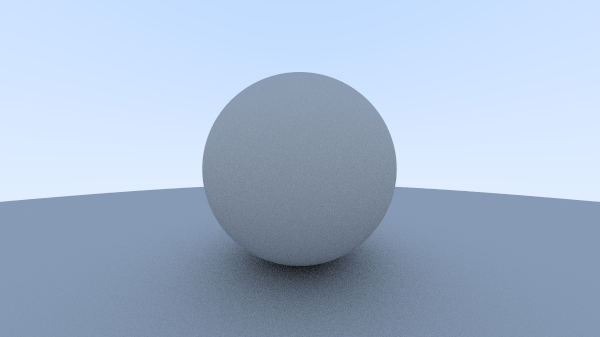
We can create a more “true” lambertian reflection by creating a new method to get a vector in the unit sphere:
// src/vec3.rs

// ...

pub fn random_unit_vector() -> Vec3 {
    let mut rng = thread_rng();

    let a: f64 = rng.gen_range(0.0..(2.0 * PI));
    let z: f64 = rng.gen_range(-1.0..1.0);
    let r: f64 = (1.0 - z * z).sqrt();
    Vec3::new(r * a.cos(), r * a.sin(), z)
}

// ...
This is a drop-in replacement for random_in_unit_sphere() in main.rs, and when we run this we end up with:
The shadows are a bit less pronounced, and the spheres appear slightly lighter.
Chapter 9⌗
The Scatter Trait⌗
Similarly to how we introduced some abstraction for “hittable” objects, if we want objects to have different materials, then we should introduce some abstraction for the interaction between rays and materials. This way, rays hitting any two objects of the same material can share implementations, and we don’t have to repeat ourselves. We’ll do this with another trait: Scatter (another slight deviation from the book) with one method scatter. In the C++ implementation, an uninitialized ray is sent into the function and mutated within the scatter function. We want to avoid doing this in Rust, as the implementation can get quite messy. Instead, we define a new type called ScatteredRay which wraps a ray that has been scattered, and the attenuation of that scattered ray. Since rays (light) can be absorbed by an object, there is the possibility that there won’t be a scattered ray, so we wrap this type in an Option<>:
// src/material.rs
use crate::{
    hit::HitRecord,
    ray::Ray,
    vec3::{random_unit_vector, Color},
};

pub struct ScatteredRay {
    pub attenuation: Color,
    pub scattered: Ray,
}

pub trait Scatter {
    fn scatter(&self, r_in: &Ray, rec: &HitRecord) -> Option<ScatteredRay>;
}
We’ll add this to the HitRecord:
// src/hit.rs

// ...

#[derive(Copy, Clone)]
pub struct HitRecord<'a> {
    // ...
    pub mat: &'a dyn Scatter,
    // ...
}

impl HitRecord<'_> {
    // ...
}
That <'a> looks a little funny, but this is a concept in rust called lifetimes. What we’re saying is that the mat field contains a borrowed value of any type that implements the Scatter trait. To make sure that we aren’t going to free up those underlying resources prematurely, we need to specify that the HitRecord object that is created lives as long as the mat object within it.
We’ll also add this to the Sphere type:
// src/sphere.rs

// ...
pub struct Sphere {
    pub center: Point3,
    pub radius: f64,
    pub mat: Box<dyn Scatter>,
}

impl Sphere {
    pub fn new(center: Point3, radius: f64, mat: Box<dyn Scatter>) -> Self {
        Sphere {
            // ...
            mat,
        }
    }
}


impl Hit for Sphere {
    fn hit(&self, r: &Ray, t_min: f64, t_max: f64) -> Option<HitRecord> {
        // ...
        let mut hit_record = HitRecord {
            // ...
            mat: &*self.mat,
            // ...
        };
        // ...
    }
}
The Lambertian Material⌗
We already have this, so we’ll just create a Lambertian type and implement the Scatter trait for it:
// src/material.rs

// ...

pub struct Lambertian {
    pub albedo: Color,
}

impl Scatter for Lambertian {
    fn scatter(&self, _: &Ray, rec: &HitRecord) -> Option<ScatteredRay> {
        let scatter_direction = rec.normal + random_unit_vector();
        Some(ScatteredRay {
            scattered: Ray::new(rec.p, scatter_direction),
            attenuation: self.albedo,
        })
    }
}
The Reflective Material⌗
Reflective materials are quite simple to implement - we start with a simple reflect function:
// src/vec3.rs

// ...

pub fn reflect(v: Vec3, n: Vec3) -> Vec3 {
    v - 2.0 * dot(&v, &n) * n
}
And we simply create a Metal type and impelent the Scatter trait using reflect:
// src/material.rs

// ...

pub struct Metal {
    pub albedo: Color,
}

impl Scatter for Metal {
    fn scatter(&self, r_in: &Ray, rec: &HitRecord) -> Option<ScatteredRay> {
        let reflected = reflect(unit_vector(r_in.direction), rec.normal);
        let scattered = Ray::new(rec.p, reflected);
        if dot(&scattered.direction, &rec.normal) > 0.0 {
            return Some(ScatteredRay {
                scattered,
                attenuation: self.albedo,
            });
        }

        None
    }
}
We’ll modify the ray_color function in main to use this new functionality:
// src/bin/main.rs

// ...

fn ray_color(r: &Ray, world: &dyn Hit, depth: u32) -> Color {
    // ...

    if let Some(hit) = world.hit(r, 0.001, f64::INFINITY) {
        if let Some(scattered) = hit.mat.scatter(&r, &hit) {
            return scattered.attenuation * ray_color(&scattered.scattered, world, depth - 1);
        }
        // ...
    }

    // ...
}

// ...
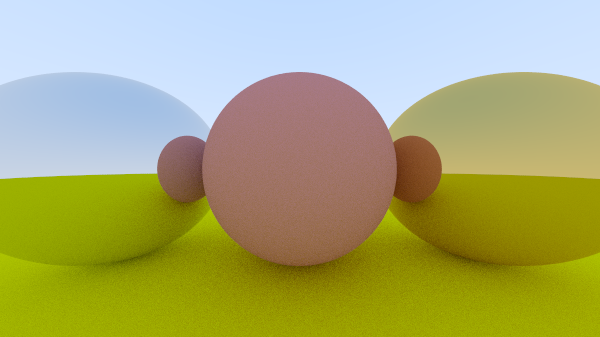
Now we can create a scene with a few metal spheres:
// src/bin/main.rs

// ...

fn main() {
    // ...

    // world
    let material_ground = Box::new(Lambertian {
        albedo: Color::new(0.8, 0.8, 0.0),
    });
    let material_center = Box::new(Lambertian {
        albedo: Color::new(0.7, 0.3, 0.3),
    });
    let material_left = Box::new(Metal {
        albedo: Color::new(0.8, 0.8, 0.8),
    });
    let material_right = Box::new(Metal {
        albedo: Color::new(0.8, 0.6, 0.2),
    });

    let world: Vec<Box<dyn Hit>> = vec![
        Box::new(Sphere::new(
            Point3::new(0.0, -100.5, -1.0),
            100.0,
            material_ground,
        )),
        Box::new(Sphere::new(
            Point3::new(0.0, 0.0, -1.0),
            0.5,
            material_center,
        )),
        Box::new(Sphere::new(
            Point3::new(-1.0, 0.0, -1.0),
            0.5,
            material_left,
        )),
        Box::new(Sphere::new(
            Point3::new(1.0, 0.0, -1.0),
            0.5,
            material_right,
        )),
    ];

    // ...
}
Which gives us this picture:
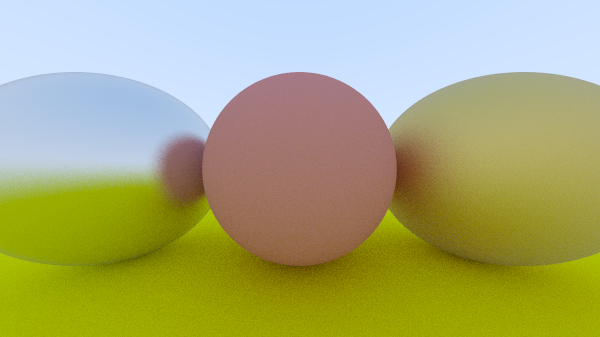
Reflective materials can be totally reflective, or matte depending on how smooth or polished the surface is - think of it like the two sides of aluminum foil. We can achieve this same effect by adding a fuzz property to the Metal type, and adding a random unit vector scaled by fuzz to the scattered ray:
// src/material.rs

// ...

pub struct Metal {
    pub albedo: Color,
    pub fuzz: f64,
}

impl Scatter for Metal {
    fn scatter(&self, r_in: &Ray, rec: &HitRecord) -> Option<ScatteredRay> {
        // ...
        let scattered = Ray::new(rec.p, reflected + self.fuzz * random_in_unit_sphere());
        // ...
    }
}
And after modifying the materials in main:
// src/bin/main.rs

// ...

fn main() {
    // ...

    let material_left = Box::new(Metal {
        albedo: Color::new(0.8, 0.8, 0.8),
        fuzz: 0.3,
    });
    let material_right = Box::new(Metal {
        albedo: Color::new(0.8, 0.6, 0.2),
        fuzz: 1.0,
    });

    // ...
}
We wind up with this image:
Chapter 10⌗
The Dielectric Material⌗
Similarly to the reflective material, we start by defining a refract function using Snell’s law:
// src/vec3.rs

// ...

pub fn refract(uv: Vec3, n: Vec3, etai_over_etat: f64) -> Vec3 {
    let cos_theta = dot(&(-1.0 * uv), &n);
    let r_out_perp = etai_over_etat * (uv + cos_theta * n);
    let r_out_parallel = -((1.0 - r_out_perp.length_squared()).abs()).sqrt() * n;
    r_out_perp + r_out_parallel
}
And then we define the dielectric material:
// src/material.rs

// ...

pub struct Dielectric {
    pub ir: f64,
}

impl Scatter for Dielectric {
    fn scatter(&self, r_in: &Ray, rec: &HitRecord) -> Option<ScatteredRay> {
        let refraction_ratio = if rec.front_face {
            1.0 / self.ir
        } else {
            self.ir
        };

        let unit_direction = unit_vector(r_in.direction);
        let refracted = refract(unit_direction, rec.normal, refraction_ratio);

        Some(ScatteredRay {
            scattered: Ray::new(rec.p, refracted),
            attenuation: Color::new(1.0, 1.0, 1.0),
        })
    }
}
And alter the materials in main:
// src/bin/main.rs

// ...

fn main() {
    // ...

    let material_center = Box::new(Dielectric { ir: 1.5 });
    let material_left = Box::new(Dielectric { ir: 1.5 });

    // ...
}
When we run this, we get the following:
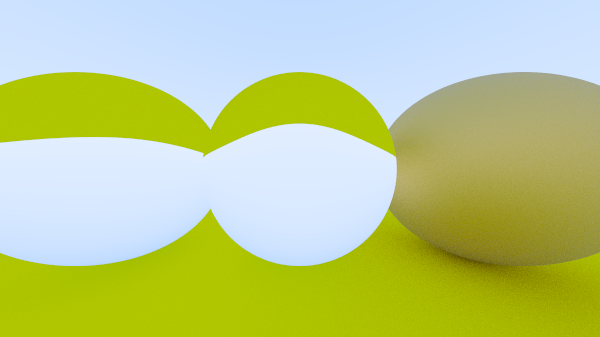
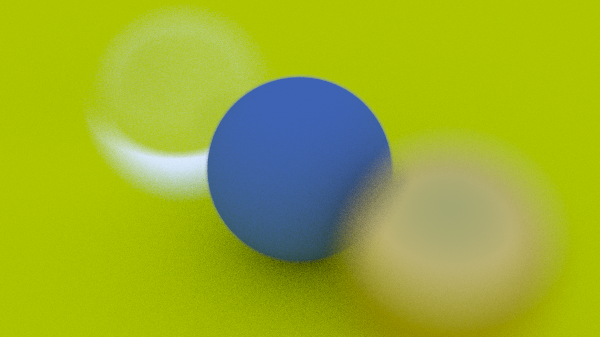
As noted in the book, this doesn’t look quite right. For starters, light within the material - depending on the angle and the refractive index of the material - has the chance to not actually refract and will instead reflect (total internal reflection). Additionally, materials like glass can reflect light depending on the angle, and we can use a polynomial approximation called Schlick’s approximation to model this. All together:
// src/material.rs

// ...

impl Scatter for Dielectric {
    fn scatter(&self, r_in: &Ray, rec: &HitRecord) -> Option<ScatteredRay> {
        // ...

        let cos_theta = dot(&(-1.0 * unit_direction), &rec.normal).min(1.0);
        let sin_theta = (1.0 - cos_theta * cos_theta).sqrt();
        let reflected = reflect(unit_direction, rec.normal);
        if (etai_over_etat * sin_theta) > 1.0 {
            return Some(ScatteredRay {
                attenuation,
                scattered: Ray::new(rec.p, reflected),
            });
        }

        let reflect_prob = schlick(cos_theta, etai_over_etat);
        if rng.gen::<f64>() < reflect_prob {
            return Some(ScatteredRay {
                attenuation,
                scattered: Ray::new(rec.p, reflected),
            });
        }
        let refracted = refract(unit_direction, rec.normal, etai_over_etat);
        Some(ScatteredRay {
            attenuation,
            scattered: Ray::new(rec.p, refracted),
        })
    }
}

pub fn schlick(cosine: f64, ref_idx: f64) -> f64 {
    let mut r0 = (1.0 - ref_idx) / (1.0 + ref_idx);
    r0 = r0 * r0;
    r0 + (1.0 - r0) * (1.0 - cosine).powi(5)
}
This produces a more accurate representation of a glass sphere:
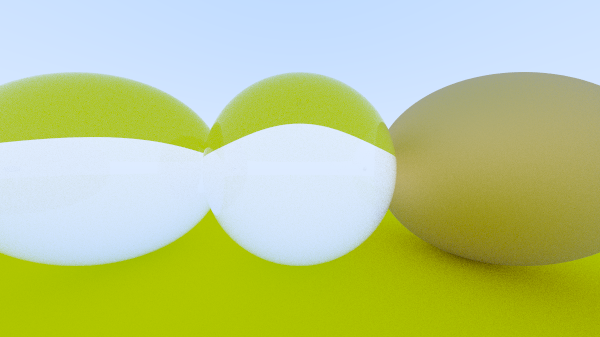
Note the faint partial reflection of the right metal sphere on the center glass sphere, and the interference on the left side of the center sphere from the light interacting with the glass sphere on the left.
Chapter 11⌗
We’re almost to the end! At this point all we have left is creating a more configurable camera with some extra features. The book starts with adding field of view to the camera type:
// src/camera.rs

// ...

impl Camera {
    pub fn new(vfov: f64, aspect_ratio: f64) -> Self {
        let theta = degrees_to_radians(vfov);
        let h = (theta / 2.0).tan();
        let viewport_height = 2.0 * h;
        let viewport_width = aspect_ratio * viewport_height;
        // ...
    }

    // ...
}
And we’ll adjust main to use instantiate the camera with these new objects, and alter the world to get a better example:
// src/bin/main.rs

// ...

fn main() {
    // ...

    // world
    let r = (PI / 4.0).cos();
    let material_left = Box::new(Lambertian {
        albedo: Color::new(0.0, 0.0, 1.0),
    });
    let material_right = Box::new(Lambertian {
        albedo: Color::new(1.0, 0.0, 0.0),
    });

    let world: Vec<Box<dyn Hit>> = vec![
        Box::new(Sphere::new(Point3::new(-r, 0.0, -1.0), r, material_left)),
        Box::new(Sphere::new(Point3::new(r, 0.0, -1.0), r, material_right)),
    ];

    // camera
    let cam = Camera::new(90.0, aspect_ratio);

    // ...
}
And we end up with a wide-angle view of a red and blue sphere:
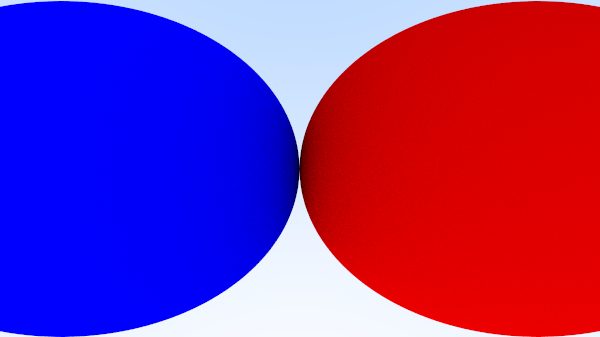
Now we want to change the camera such that we can use any arbitrary view point rather than just a head-on view of the scene:
// src/camera.rs

// ...

impl Camera {
    pub fn new(lookfrom: Vec3, lookat: Vec3, vup: Vec3, vfov: f64, aspect_ratio: f64) -> Self {
        // ...

        let w = unit_vector(lookfrom - lookat);
        let u = unit_vector(cross(&vup, &w));
        let v = cross(&w, &u);

        let origin = lookfrom;
        let horizontal = viewport_width * u;
        let vertical = viewport_height * v;
        Camera {
            origin,
            horizontal,
            vertical,
            lower_left_corner: origin - horizontal / 2.0 - vertical / 2.0 - w,
        }
    }

    // ...
}
And again we change main to see the results:
//src/bin/main.rs

// ...

fn main() {
    // ...


    // world
    let material_ground = Box::new(Lambertian {
        albedo: Color::new(0.8, 0.8, 0.0),
    });
    let material_center = Box::new(Lambertian {
        albedo: Color::new(0.1, 0.2, 0.5),
    });
    let material_left = Box::new(Dielectric { ir: 1.5 });
    let material_right = Box::new(Metal {
        albedo: Color::new(0.8, 0.6, 0.2),
        fuzz: 0.0,
    });

    let world: Vec<Box<dyn Hit>> = vec![
        Box::new(Sphere::new(
            Point3::new(0.0, -100.5, -1.0),
            100.0,
            material_ground,
        )),
        Box::new(Sphere::new(
            Point3::new(0.0, 0.0, -1.0),
            0.5,
            material_center,
        )),
        Box::new(Sphere::new(
            Point3::new(-1.0, 0.0, -1.0),
            0.5,
            material_left,
        )),
        Box::new(Sphere::new(
            Point3::new(1.0, 0.0, -1.0),
            0.5,
            material_right,
        )),
    ];

    // camera
    let cam = Camera::new(
        Point3::new(-2.0, 2.0, 1.0),
        Point3::new(0.0, 0.0, -1.0),
        Vec3::new(0.0, 1.0, 0.0),
        20.0,
        aspect_ratio,
    );

    // ...
}
And we get:
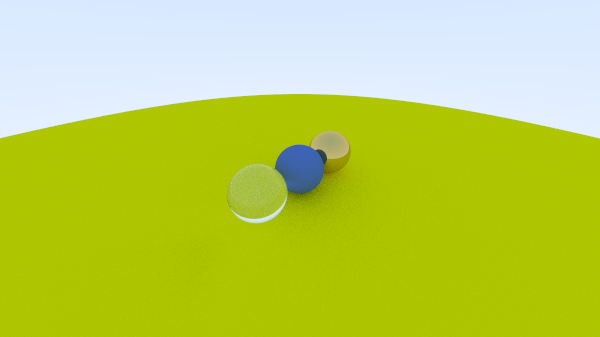
We can zoom in by changing the field of view from 90.0 to 20.0 and we get:
Chapter 12⌗
Final chapter! In this chapter we’ll put the finishing touches on the camera implementation and add some defocus blur or depth of field. The book does this by generating random rays originating from inside a disk centered at the point we are looking from. First, we’ll create a random_in_unit_disk function to generate these rays:
// src/vec3.rs

// ...

pub fn random_in_unit_disk() -> Vec3 {
    let mut rng = thread_rng();

    loop {
        let p = Vec3::new(rng.gen_range(-1.0..1.0), rng.gen_range(-1.0..1.0), 0.0);
        if p.length_squared() < 1.0 {
            return p;
        }
    }
}

// ...
Then we update the camera:
// src/camera.rs

// ...

pub struct Camera {
    // ...
    pub u: Vec3,
    pub v: Vec3,
    pub w: Vec3,
    pub lens_radius: f64,
}

impl Camera {
    pub fn new(
        lookfrom: Vec3,
        lookat: Vec3,
        vup: Vec3,
        vfov: f64,
        aspect_ratio: f64,
        aperture: f64,
        focus_dist: f64,
    ) -> Self {
        // ...

        let origin = lookfrom;
        let horizontal = focus_dist * viewport_width * u;
        let vertical = focus_dist * viewport_height * v;
        let lower_left_corner = origin - horizontal / 2.0 - vertical / 2.0 - focus_dist * w;
        let lens_radius = aperture / 2.0;
        Camera {
            origin,
            horizontal,
            vertical,
            lower_left_corner,
            u,
            v,
            w,
            lens_radius,
        }
    }

    pub fn get_ray(&self, u: f64, v: f64) -> Ray {
        let rd = self.lens_radius * random_in_unit_disk();
        let offset = self.u * rd.x() + self.v * rd.y();
        Ray::new(
            self.origin + offset,
            self.lower_left_corner + u * self.horizontal + v * self.vertical - self.origin - offset,
        )
    }
}
And after updating main:
// src/bin/main.rs

// ...

fn main() {
    // ...

    // camera
    let lookfrom = Point3::new(3.0, 3.0, 2.0);
    let lookat = Point3::new(0.0, 0.0, -1.0);
    let vup = Vec3::new(0.0, 1.0, 0.0);
    let dist_to_focus = (lookfrom - lookat).length();
    let aperture = 2.0;

    let cam = Camera::new(
        lookfrom,
        lookat,
        vup,
        20.0,
        aspect_ratio,
        aperture,
        dist_to_focus,
    );

    // ...
}
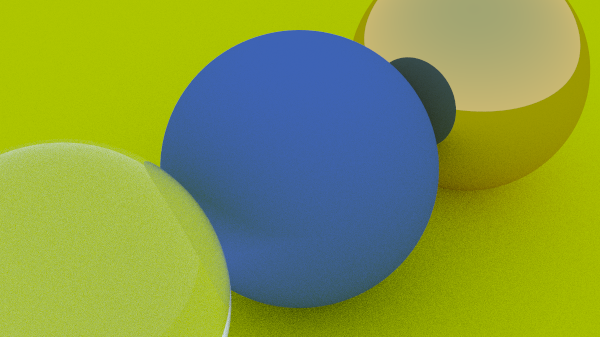
We find ourselves with this image:
Believe it or not, we’re actually pretty much done with the book, and we now have a basic ray tracer!
Chapter 13⌗
This final chapter is just setting up some functions in main to set up a random scene with a bunch of spheres:
// src/bin/main.rs

// ...

fn random_scene(rng: &mut ThreadRng) -> Vec<Box<dyn Hit>> {
    let mut world: Vec<Box<dyn Hit>> = Vec::new();
    let ground_material = Box::new(Lambertian {
        albedo: Color::new(0.5, 0.5, 0.5),
    });
    world.push(Box::new(Sphere {
        center: Point3::new(0.0, -1000.0, 0.0),
        radius: 1000.0,
        mat: ground_material,
    }));

    for a in -11..11 {
        for b in -11..11 {
            let choose_mat = rng.gen::<f64>();
            let center = Point3::new(
                a as f64 + 0.9 * rng.gen::<f64>(),
                0.2,
                b as f64 + 0.9 * rng.gen::<f64>(),
            );
            if (center - Point3::new(4.0, 0.2, 0.0)).length() > 0.9 {
                if choose_mat < 0.8 {
                    // diffuse
                    let albedo = Color::random() * Color::random();
                    let sphere_material = Box::new(Lambertian { albedo });
                    world.push(Box::new(Sphere {
                        center,
                        radius: 0.2,
                        mat: sphere_material,
                    }));
                } else if choose_mat < 0.95 {
                    // metal
                    let albedo = Color::random_range(0.5, 1.0);
                    let fuzz = rng.gen_range(0.0..0.5);
                    let sphere_material = Box::new(Metal { albedo, fuzz });
                    world.push(Box::new(Sphere {
                        center,
                        radius: 0.2,
                        mat: sphere_material,
                    }));
                } else {
                    // glass
                    let sphere_material = Box::new(Dielectric { ir: 1.5 });
                    world.push(Box::new(Sphere {
                        center,
                        radius: 0.2,
                        mat: sphere_material,
                    }));
                }
            }
        }
    }

    let large_glass_material = Box::new(Dielectric { ir: 1.5 });
    world.push(Box::new(Sphere {
        center: Point3::new(0.0, 1.0, 0.0),
        radius: 1.0,
        mat: large_glass_material,
    }));

    let large_diffuse_material = Box::new(Lambertian {
        albedo: Color::new(0.4, 0.2, 0.1),
    });
    world.push(Box::new(Sphere {
        center: Point3::new(-4.0, 1.0, 0.0),
        radius: 1.0,
        mat: large_diffuse_material,
    }));

    let large_metal_material = Box::new(Metal {
        albedo: Point3::new(0.7, 0.6, 0.5),
        fuzz: 0.0,
    });
    world.push(Box::new(Sphere {
        center: Point3::new(4.0, 1.0, 0.0),
        radius: 1.0,
        mat: large_metal_material,
    }));

    world
}

// ...

fn main() {
    // ...

    // world
    let world = random_scene(&mut rng);

    // camera
    let lookfrom = Vec3::new(13.0, 2.0, 3.0);
    let lookat = Vec3::new(0.0, 0.0, 0.0);
    let vup = Vec3::new(0.0, 1.0, 0.0);
    let dist_to_focus = 10.0;
    let aperture = 0.1;
}
When we run this, we get a nice scene with a bunch of spheres:
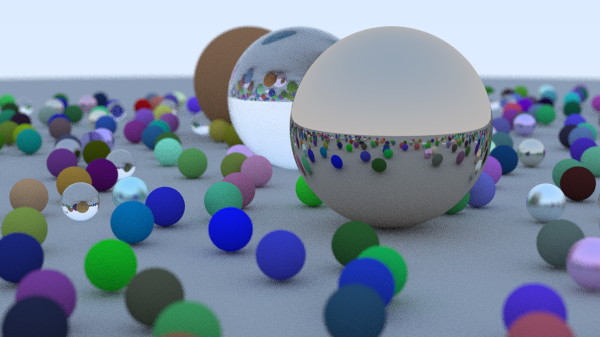
Note: if you’re running this you may notice a pretty significant increase in runtime - even when using cargo build --release && cargo run --release. On my machine (2017 2.3 GHz dual core i5 Macbook Pro), this took about 3 minutes for a 600 pixel-wide image with 100 samples per pixel. It took over an hour to generate an image with 500 samples per pixel. Quite obviously, the more samples per pixel, the sharper and better looking the image will be.
And that’s it for book 1! You can check out all of my code with tags for the end of each chapter on my github. Happy ray tracing!
Addendum⌗
Splitting up the work⌗
One way we can speed up some of the calculations when running this locally is by distributing the work across all available cores. We can use the rayon crate to turn our iterators into parallel iterators, and we can apply the function that sends rays into the scene as a function in a flat map on those iterators. First, we need to set some stuff up by adding the Sync trait bound to both Hit and Scatter:
// src/hit.rs

// ...

pub trait Hit: Sync {
    fn hit(&self, r: &Ray, t_min: f64, t_max: f64) -> Option<HitRecord>;
}

// ...
// src/material.rs

// ...

pub trait Scatter: Sync {
    fn scatter(&self, r_in: &Ray, rec: &HitRecord) -> Option<ScatteredRay>;
}

// ...
We also need to modify our write_color function to instead just generate a vector of u8s:
// src/color.rs

// ...

pub fn write_color(pixel_color: Color, samples_per_pixel: u32) -> Vec<u8> {
    let mut r = pixel_color.x();
    let mut g = pixel_color.y();
    let mut b = pixel_color.z();

    let scale = 1.0 / samples_per_pixel as f64;
    r *= scale;
    b *= scale;
    g *= scale;

    vec![
        (255.99 * clamp(r.sqrt(), 0.0, 0.999)) as u8,
        (255.99 * clamp(g.sqrt(), 0.0, 0.999)) as u8,
        (255.99 * clamp(b.sqrt(), 0.0, 0.999)) as u8,
        255,
    ]
}
And finally we’ll change our main loop inside of main to use the parallel iterators, and add another loop to split the output into chunks that we can display:
// src/bin/main.rs

// ...

fn main() {
    // ...

    let mut data = Vec::new();
    let image = (0..height as usize)
        .into_par_iter()
        .rev()
        .flat_map(|j| {
            (0..width)
                .into_par_iter()
                .flat_map(|i| {
                    let mut rng = thread_rng();

                    let mut pixel_color = Color::new(0.0, 0.0, 0.0);
                    for _s in 0..samples_per_pixel {
                        let u = (i as f64 + rng.gen::<f64>()) / (width - 1) as f64;
                        let v = (j as f64 + rng.gen::<f64>()) / (height as usize - 1) as f64;
                        let r = cam.get_ray(u, v);
                        pixel_color += ray_color(&r, &world, max_depth);
                    }
                    write_color(pixel_color, samples_per_pixel)
                })
                .collect::<Vec<u8>>()
        })
        .collect::<Vec<u8>>();

    for col in image.chunks(4) {
        let col_vec = col.to_vec();
        data.extend_from_slice(col_vec.as_slice());
    }

    // ...
}
And we end up with a very similar looking image:
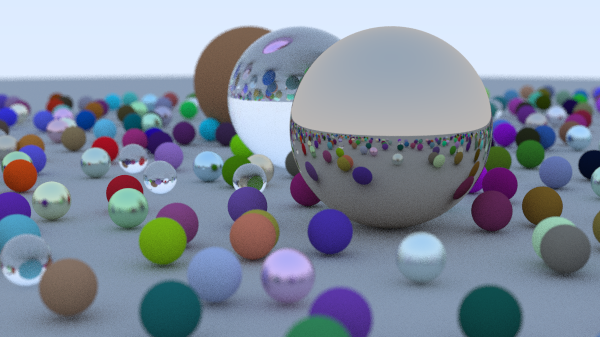
But with a runtime of only around 1 minute!